Blend Property
Blender-style modifiers and runtime physics for Unity meshes, in standalone games and VRChat worlds.
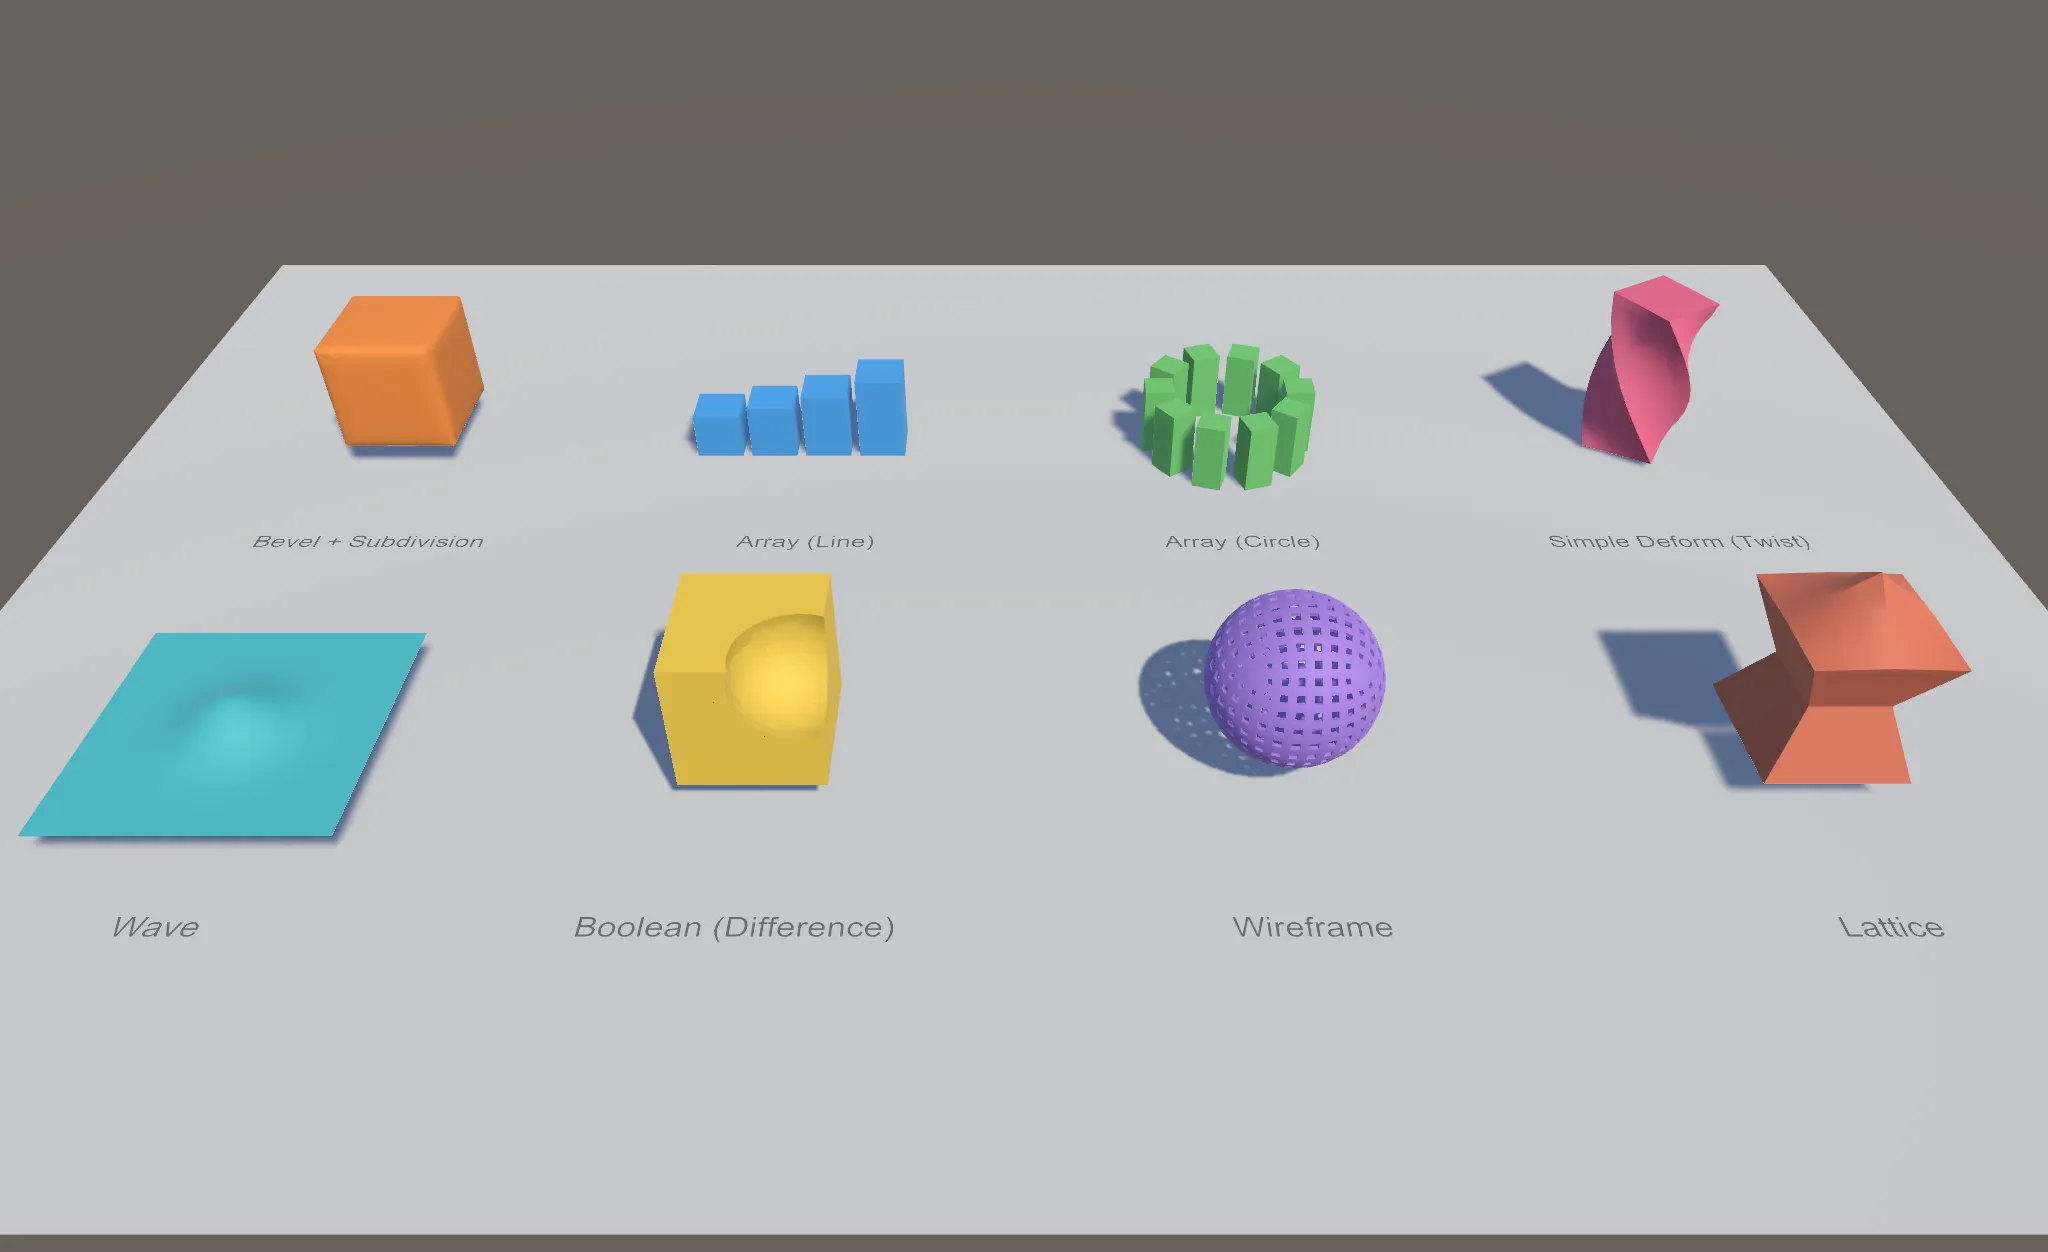
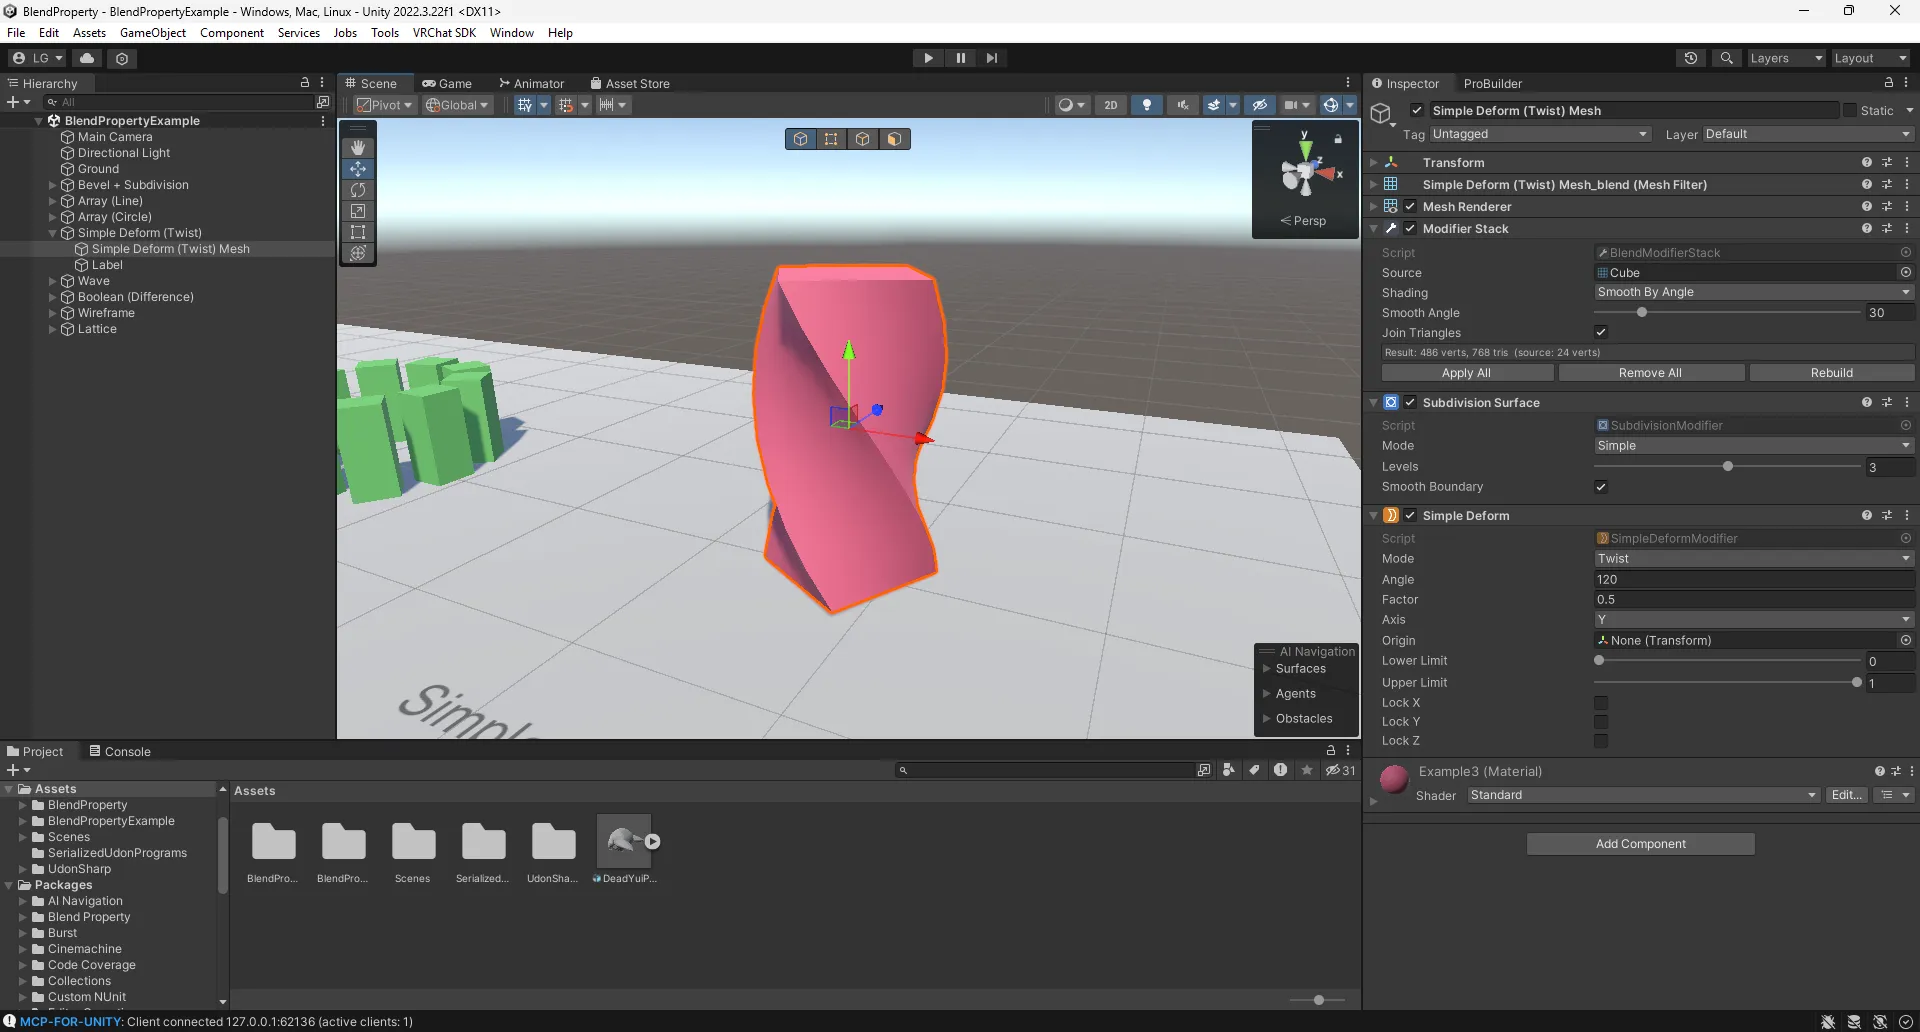
- Install: Package Manager → + → Add package from git URL… →
https://github.com/LogicCuteGuy/BlendProperty.git, or copy this repo intoPackages/. Needs Unity 2022.3+. - Examples in
Packages/Blend Property/Example/:BlendPropertyExample.unityshows ten modifier stacks (two follow a Unity Splines path).VRChat/BlendPropertyVRChatExample.unity: runtime motion in a VRChat world (Udon deformers and the Wave and Ocean shaders). Press Play. Includes runtime Line/Circle Array generation, with the same labels and synced control panels as the other examples. All pickups use VRC Object Sync for shared position, rotation and physics, with remote rigidbodies kept kinematic so the owner drives their motion. Existing Reset Objects buttons respawn their targets for everyone. GPU simulations and fracture-piece physics still run locally; their full state is not replicated to late joiners.Standalone/BlendPropertyStandaloneExample.unity:RebuildNow()in a non-VRChat project. Press Play.
- Guide: Documentation~/BlendProperty.md covers a walkthrough, Lattice setup, builds and troubleshooting.
- Screenshot tutorials: all modifiers, all runtime stations, and physics, interaction and editor workflow. Each includes settings, actions, expected results and full-size Unity Editor screenshots.
Use
- Select any object with a MeshFilter (an FBX child, a primitive or a ProBuilder mesh), then choose Add Component → Blend Property → Modifiers → … After the first one, the Modifier Stack’s Add Modifier button lists them all (Generate / Deform / Edit / Normals), like Blender.
- Stack order is the component order. Drag components or use their ⋮ menu (Move Up/Down, Move to First/Last).
- The component checkbox shows or hides the modifier, like Blender’s viewport toggle. Unchecking the Modifier Stack turns them all off and shows the original mesh.
- Remove All (Modifier Stack button or any ⋮ menu) drops every modifier without applying and puts the original mesh back, in one undo step. GameObject → Blend Property → Modifiers → Remove All in Children does a whole model.
- Apply (component ⋮ menu): bakes this modifier and every enabled one above it into the source mesh. Apply All bakes the whole stack. GameObject → Blend Property → Modifiers → Apply All in Children bakes a whole model.
- Shading (Smooth by Angle / Smooth / Flat / Keep Imported) is set on the Modifier Stack component.
- Results are saved to
Assets/BlendProperty/Baked/. Tools → Blend Property → Delete Unused Baked Meshes clears the ones nothing uses anymore. On build, every Blend component is stripped and only the baked mesh ships (unless Keep at Runtime is on, see Runtime). That makes it safe for VRChat worlds.
ProBuilder
Modifiers stay live while you edit the shape. In vertex, edge or face mode the cage is shown without modifiers. Apply writes the result back into the ProBuilderMesh, so it stays editable.
Modifiers
Options follow the Blender 5.2 manual. Unity is Y-up, so Blender’s Z (Wave, Cylinder Cast, Simple Deform, Array circle axis) is Y here. Distances are in metres (see Units and axes).
- Generate
- Array: Shape Line (Relative / Offset / Endpoint, per-copy rotation and scale), Circle (Full / Arc, radius, sweep, central axis, count or angular distance), Curve (through Transforms or a Unity Splines container) or Transform (input or object, relative or world). Align Rotation, Local Rotation, Randomize (offset, rotation, uniform / per-axis scale, flipping, exclude first / last, seed), Merge, Split Copies (each copy is an “Array Copy N” child sharing the final mesh, so later modifiers apply per copy), Collider Per Copy (child BoxColliders so a Rigidbody gets the array’s shape).
- Bevel: Affect Edges / Vertices, Width Type Offset / Width / Depth / Percent, Limit Method None / Angle, Segments, Profile, Clamp Overlap (per edge), Harden Normals, Material.
- Boolean: Intersect / Union / Difference, Operand Object or Collection (every mesh under one object).
- Decimate: Collapse (+ Triangulate), Un-Subdivide, Planar (+ Delimit Material / UV).
- Mirror: Axis, Bisect, Flip, Bisect Distance, Mirror Object, Merge, Flip U / V, UV Offset.
- Remesh: Blocks / Smooth / Sharp (Octree Depth, Scale, Sharpness), Voxel (Voxel Size), Remove Disconnected.
- Screw: Angle, Screw, Iterations, Axis, Axis Object, Object Screw, Steps, Merge, Stretch U / V, Flip.
- Solidify: Thickness, Offset, Even Thickness, Rim Fill, Only Rim, Flip Normals, Clamp, Material / Rim material offset.
- Subdivision Surface, Triangulate (Quad Method, N-gon Method, Minimum Vertices), Weld (All / Connected), Wireframe (Thickness, Offset, Even, Relative, Replace Original, Material Offset).
- Deform: Cast (+ Size from Radius), Curve (Transforms or a Unity Splines
SplineContainer), Displace (Normal / Custom Normal / X / Y / Z / RGB to XYZ, Local / Global space and coordinates), Hook, Laplacian Smooth (axes, negative factor exaggerates), Lattice (Blend Property/Modifiers/Lattice Object), Shrinkwrap (Nearest Surface Point / Project / Nearest Vertex, five Snap Modes, project axes / direction / face cull / auxiliary target), Simple Deform (+ Lock), Smooth, Warp (+ Preserve Volume), Wave (+ Life, Damping, normal axes). - Edit: UV Project, UV Warp
- Normals: Smooth by Angle, Weighted Normal (+ Threshold), Normal Edit (+ Subtract, Max Angle)
Not available: anything that needs vertex groups, creases, bevel weights or face strength (Unity meshes don’t carry them), Boolean’s Exact solver and Self Intersection, Solidify Complex mode, Decimate Symmetry, Shrinkwrap Target Normal Project, Remesh Adaptivity.
Units and axes
- Distances are in Unity units (metres in the scene), whatever the object’s scale: Bevel width 0.02 is 2 cm on a Scale 1 cube and on a centimetre FBX imported at Scale 100. Scaling the object rebuilds the stack. This covers widths, thicknesses, radii, offsets, merge/weld distances, voxel size, Array spacing and Wave sizes. Percentages, factors, angles and UV values aren’t distances and are unchanged.
- Axes are Unity’s: Y is up, Z is forward. Where Blender defaults to Z-up (Array circle, Wave, Cylinder Cast, Simple Deform, Screw) the default here is Y.
- Non-uniformly scaled objects use the average of their three axis scales for plain distances (per-axis for offsets like Array Translation).
Limits
- MeshFilter only. SkinnedMeshRenderer, blend shapes and bones aren’t supported.
- No vertex groups.
- Bevel caps corners with a triangle fan, not Blender’s patch grid. Affect: Vertices is one flat cut (Segments is ignored).
- Decimate Un-Subdivide only works on all-quad meshes that came from subdividing; anything else is left as is.
- Boolean is BSP CSG: closed meshes only, slow past a few thousand faces, leaves T-junctions on cut edges. Hide the cutter’s renderer yourself.
- Shrinkwrap checks every target triangle, so big targets are slow.
- UV Project takes one orthographic projector.
- Remesh uses an inside/outside voxel grid (no distance field): parts thinner than a voxel vanish, max 192 voxels per axis.
- Hook has no vertex groups: it moves everything within its radius. Reset Hook (⋮ menu) rebinds.
- Decimate uses greedy QEM.
- Lattice is trilinear.
- The Wave modifier is baked at a fixed time unless its Runtime is GPU (see Runtime), or use the Wave shader.
Performance
- Only what changed is rebuilt: modifiers above the first one that follows another object (or above the last modifier) are cached.
- A stack that takes more than 80 ms to rebuild waits until you release the mouse, so dragging stays smooth. Light stacks update live.
Runtime
Stacks are baked in the editor and stripped from builds by default. For runtime changes:
-
Standalone (non-VRChat) builds: tick Keep at Runtime on the Modifier Stack. The stack ships with the build: change modifier fields from a script, then call
stack.RebuildNow(). The source mesh needs Read/Write enabled (the build warns if it isn’t). Each call re-runs the whole stack, so keep it out ofUpdatefor heavy stacks. -
VRChat worlds (UdonSharp / LCGUdonSharp): Udon can’t run the modifier stack, so VRChat builds always strip it. Use these instead, on top of the baked mesh (one per mesh):
- Runtime GPU on a modifier: Wave, Simple Deform, Lattice, Hook and Warp have Runtime: Off / GPU. Set GPU and the modifier stays live in the world: the build ships the mesh without it and adds a BlendUdonDeformStack that runs it on the GPU, following moving objects (Hook target, Warp from/to, Simple Deform origin, the Lattice cage and its child points) and animating Wave with Animate. Keep Runtime modifiers at the bottom of the stack. From Udon:
GetComponent<BlendUdonDeformStack>(),FindOp("Wave"),SetFloat(op, "height", 1f). - BlendUdonCloth: Blender Cloth / Soft Body physics simulated on the GPU. Pin with the vertex color red channel. Works with any material/shader because the result is written back into the mesh. Sphere, Capsule and Box colliders. Shape makes a free jelly body that keeps its volume and tumbles. Use ⋮ → Bake Cloth after changing the mesh or pinning.
- BlendUdonParticles (GameObject → Blend Property → Physics → Particle System, or Add Component → … → Simulation → Particle System): Blender Particle System (Emitter) on the GPU with Unity Particle System modules. Born from the mesh or a Sphere, Hemisphere, Cone, Box, Circle or Edge shape, at a Rate, over distance, in Bursts or by
Emit(). Gravity, Noise, Force Fields, drag and Sphere, Capsule and Box colliders (bounce, friction and kill set per collider by a BlendUdonCollision on it, filtered by layer) act on them; colour, size, rotation and texture-sheet frame change over life. The Blend Property/Particles shader draws Billboard, Stretched, Horizontal or Vertical quads, or Render As Object draws a lit mesh per particle (Blender’s Particle Instance). Preview plays it in the Scene view. Tens of thousands cost Udon almost nothing. - BlendUdonHair: Blender Hair + Hair Dynamics on the GPU. Strands grow from the mesh, swing with gravity and Force Fields, keep their shape by Stiffness, and lie on Sphere, Capsule and Box colliders. The Blend Property/Hair shader draws them as smooth lit ribbons. Thousands of strands cost Udon almost nothing. Use ⋮ → Bake Hair.
- BlendUdonExplode: Blender’s Explode modifier. Bake copies your material’s look (colour, texture, normal map, smoothness, metallic, emission from Standard, URP, lilToon, Poiyomi and similar) onto the Explode shader, or keeps your material as is when its shader includes
BlendExplode.cginc(see Other shaders).Explode()sends every face flying, tumbling and landing on the floor, all in the shader, so it costs nothing;ResetExplode()puts it back. Networked. - BlendUdonFracture: Blender’s Cell Fracture. The bake cuts the mesh into Voronoi pieces (Rigidbodies, with an interior material); a hard hit or
Break()shatters it. Networked. - BlendUdonPlayerColliders (GameObject → Blend Property → Physics → Player Colliders): every player’s head, chest, hips, hands, feet, arms and legs as colliders, made at runtime as players join; every simulation feels them, hands and feet paint and make waves, and hits break Cell Fractures. Parts can be turned off or resized.
- Blend Property → Physics → Physics Tab: Blender’s Physics tab as one component. Click Cloth, Soft Body, Force Field, Collision, Fluid, Dynamic Paint, Rigid Body, Constraint, Particles, Hair, Ocean, Explode or Cell Fracture to add or remove it; it sets up, bakes and links them like Blender (every simulation feels every Force Field and collides with every Collision object).
- Blend Property/Ocean (shader): Blender’s Ocean modifier with no script. A wind-driven sea with choppy crests and foam on any subdivided plane. BlendUdonBuoyancy floats Rigidbodies on it.
- BlendUdonForceField: Blender Force Field (Force, Wind, Vortex, Turbulence, Drag, Harmonic) with Blender’s falloff power and max distance. Pushes the cloths, hair, fluids and particles that list it under Force Fields (CPU and GPU) and the Rigidbodies it lists.
- BlendUdonFluid + BlendUdonFluidFlow: Blender Fluid simulated on the GPU in a box. Gas domain (smoke and fire): smoke and fire sources, hot smoke rising, burning fuel, vorticity, Dissolve. Liquid domain: water particles (Position Based Fluids) that fall, splash, settle and keep their volume, filled from Liquid sources. Both take Sphere Collider effectors and Force Fields. Drawn by the Blend Property/Smoke or Blend Property/Liquid shader on the domain’s Cube. Udon only uploads settings. Use ⋮ → Bake Fluid Domain.
- BlendUdonDynamicPaint + BlendUdonPaintBrush: paint onto a flat canvas or a mesh’s UV texture with Brush, Pen, Airbrush and Stamp tools. Optional textured tips (grayscale/alpha masks or tinted colour images), connected strokes, Hardness, Flow, Opacity, Pressure, Erase, a nib Tip Transform and optional pickup Require Use trigger. Brushes leave wet paint that darkens and dries; Dissolve fades paint. Runs on the GPU, composited over the material’s own texture. Use ⋮ → Bake Dynamic Paint, then list the brushes on the canvas. Local paint; setup and limits.
- BlendUdonDynamicWaves: Blender Dynamic Paint with a Waves or Displace surface: the same brushes make ripples that spread across the mesh, or press dents that stay or slowly recover. Simulated on the GPU and written back into the mesh, so any shader works. Use ⋮ → Bake Dynamic Waves.
- BlendUdonResetObjects: a Reset button that puts objects (thrown pickups, a moved force field) back where they started.
- BlendUdonClothPanel: in-world Simulate toggle, Reset button and sliders (gravity, wind, air damping, structural, bending, goal stiffness, collision distance and substeps) for one BlendUdonCloth.
- BlendUdonPanel: in-world toggles and sliders for any Blend Udon deformer (Wave, Simple Deform, Lattice) or a shader’s material properties (e.g. Blend Property/Wave), with an optional CPU / GPU switch.
- BlendUdonSyncedPanel: shares a Control Panel or Cloth Panel with every player, late joiners included.
- BlendUdonNetworkEvent: a button that sends an event (e.g.
ResetSimulation) to a target on every player’s machine.
Cloth and soft-body physics run on the GPU. All 21 components in
Udon/also work without the VRChat SDK as native MonoBehaviours, keeping the same names, script GUIDs, bake commands, Physics tab, inspectors and gizmos. UnityLateUpdateandAsyncGPUReadbackdrive the native simulations. - Runtime GPU on a modifier: Wave, Simple Deform, Lattice, Hook and Warp have Runtime: Off / GPU. Set GPU and the modifier stays live in the world: the build ships the mesh without it and adds a BlendUdonDeformStack that runs it on the GPU, following moving objects (Hook target, Warp from/to, Simple Deform origin, the Lattice cage and its child points) and animating Wave with Animate. Keep Runtime modifiers at the bottom of the stack. From Udon:
-
Standalone physics: use Add Component → Blend Property → Physics and the same bake commands described above. GPU Runtime modifiers work without Keep at Runtime; with it, your script owns the full stack through
RebuildNow()instead. Network Event and Synced Panel act locally. For a brush trigger, callOnPickupUseDown()/OnPickupUseUp()from your input code, or setuseHeld; Require Use off paints continuously. Player Colliders accepts Avatars (Humanoid Animators, first one local), an optional Viewpoint Transform for a camera/XR head, andRegisterPlayer(Animator)/UnregisterPlayer(Animator)for runtime changes. No networking or pickup system is installed for you. -
Examples:
Example/VRChat/andExample/Standalone/, one scene per project type. -
Project detection: with the VRChat Worlds SDK, the components use UdonSharp. Without it they use native Unity callbacks. Modifier stacks in VRChat are always stripped; standalone stacks can use Keep at Runtime. GPU simulations still require a compatible graphics device; the supplied rendering shaders target the Built-in render pipeline.
-
Any platform, any size: the Blend Property/Wave shader animates a wave on the GPU with no script. Subdivide the mesh first so it has vertices to move.
Other shaders
Which features work with your own material (lilToon, Poiyomi, Standard, …):
- Any shader: every modifier (baked mesh), Runtime GPU modifiers, BlendUdonCloth, Dynamic Waves (written back into the mesh), Dynamic Paint (paints into the material’s own texture), Cell Fracture (pieces keep your materials).
- Your shader, with one include: Explode. Add
#include "Packages/com.logiccuteguy.blendproperty/Runtime/Shaders/BlendExplode.cginc", a_ExplodeTimeproperty andBlendExplode(v.vertex, v.normal, v.texcoord2, v.texcoord3);in the vertex function (steps at the top of the file). Without that, bake swaps in the Explode shader with your material’s look copied over. - Your shader, with one include: Wave, Ocean and Render As Object particles. Add
#include "Packages/com.logiccuteguy.blendproperty/Runtime/Shaders/BlendWave.cginc"(orBlendOcean.cginc,BlendParticleInstance.cginc), its properties and one call in the vertex function:BlendWave(v.vertex, v.normal);,BlendOcean(v.vertex, v.normal);orBlendParticleInstance(v.vertex, v.normal, v.texcoord1);. Steps and property lists are at the top of each file. Ocean foam needs one more call in the fragment (BlendOceanPixel). Particles bake keeps your material on the particle renderer when its shader has the include. - Blend shaders only: Hair, Particles (billboards), Smoke, Liquid. They build their own geometry (strands, camera-facing quads, raymarched volumes) from GPU simulation textures, so another shader can’t draw them.
The catch: a locked Poiyomi or a lilToon material can’t take the include without editing the shader; Built-in render pipeline only (VRChat’s). URP / HDRP projects can still use the modifiers and CPU deformers.
Icons and gizmos
- Icon colour tells the group: Modifiers Generate blue, Deform orange, Edit green, Normals purple, Modifier Stack grey; Physics Simulation (and Physics Tab) teal, Runtime Deform pink, Destruction red, Interaction yellow.
- Unity draws each component’s icon in the Scene view, so the Gizmos menu (3D Icons, size, Fade Gizmos, per-type toggles) controls them and a click selects the object.
- Scene gizmos appear only on the selected object (not selected: just its icon) and show what the settings mean: Force Field shape, direction and Max Distance; Paint Brush and Fluid Flow radius; Fluid domain box and liquid fill level; Buoyancy probe size; Explode floor; Hook, Warp and Cast radius, Mirror plane, UV Project projector and Simple Deform axis. Every Blend type has its own row in the Scene view’s Gizmos menu: its gizmo checkbox hides that type’s icon and shapes (leave the icon column off, or Unity stacks its own copies in the middle).
Package layout
Runtime/: modifier stack andModifiers/,Shaders/(shaders you put on materials) andShaders/Simulation/(hidden GPU simulation passes).Editor/: inspectors, Apply / build stripping, icons, ProBuilder bridge.Udon/(shared VRChat / standalone components), also under Add Component → Blend Property → Physics:Deform/,Simulation/,Destruction/,Interaction/,Standalone/(native callback adapter),Editor/(Physics tab).Example/: the modifier scene;VRChat/(scene,Materials/,Meshes/,Baked/,Animation/);Standalone/.
Add a modifier
Write one file: class MyModifier : BlendModifier { public override void Apply(MeshData mesh) { … } }
License
MIT © 2026 LogicCuteGuy
Package Name
com.logiccuteguy.blendproperty
Documentation
https://github.com/LogicCuteGuy/BlendProperty/blob/v0.2.0/Documentation~/BlendProperty.md
Repositories
- LogicCuteGuy VPM Listing (3 versions)
Version
0.2.0
Unity version
2022.3 or later
Dependencies
VPM Dependencies
No dependencies
Legacy Packages
No legacy packages
License
Author
LogicCuteGuy